Tools to be Successful
To be successful in your open source journey, it's essential to familiarize yourself with the tools and platforms commonly used by the community. These tools will help you collaborate effectively, manage your projects, and contribute to open source projects. In this chapter, we'll discuss the following essential tools for open source collaboration:
- GitHub & Git
- Visual Studio Code (VS Code)
- Discord
Prerequisites
Before completing the following walkthrough, complete the following:
- Create a GitHub account
- Download VS Code
GitHub & Git
Introduction to Git
Git is a distributed version control system designed to handle everything from small to very large projects with speed and efficiency. It was created by Linus Torvalds, the creator of the Linux kernel, to manage the development of the Linux kernel itself.
Git allows developers to track changes in their code, collaborate with other developers, and manage multiple versions of their projects. Some of the key features of Git include:
- Branching: Git allows developers to create branches, which are separate copies of their codebase. This enables them to work on new features or bug fixes without affecting the main codebase. Once the changes are complete, they can merge the branch back into the main codebase.
- Staging Area: Git provides a staging area where developers can prepare their changes before committing them to the repository. This allows them to review and organize their changes before making them permanent.
- Distributed Version Control: Unlike centralized version control systems, Git is a distributed version control system. This means that every developer has a complete copy of the repository on their local machine, allowing them to work offline and independently of a central server.
Introduction to GitHub
GitHub is a web-based platform for version control and collaboration that uses Git as its underlying technology. It provides a simple and user-friendly interface for managing Git repositories, as well as a host of features and tools for collaborating with other developers.
Some of the key features of GitHub include:
- Issue Tracking: GitHub provides an integrated issue tracking system that allows developers to create, assign, and manage issues related to their projects. Issues can be categorized using labels, milestones, and assignees, making it easy to keep track of project progress and prioritize tasks.
- Pull Requests: GitHub introduces the concept of pull requests, which allow developers to propose changes to a project's codebase. Pull requests enable code review, discussion, and collaboration before changes are merged into the main codebase.
- Forking: GitHub allows users to create a copy of a repository, known as a fork. This enables them to make changes to the codebase without affecting the original project. Once the changes are complete, they can submit a pull request to have their changes reviewed and potentially merged into the main codebase.
- GitHub Actions: GitHub Actions is a powerful automation tool that allows you to create custom workflows to automate tasks like building, testing, and deploying your code.
Getting Started with Git and GitHub
To get started with Git and GitHub, follow these steps:
-
Install Git: Download and install Git on your computer by visiting the official Git website and following the installation instructions for your operating system.
-
Configure Git: After installing Git, open a terminal or command prompt and configure your Git user information by running the following commands:
git config --global user.name "Your Name"
git config --global user.email "your.email@example.com"
Replace
Your Namewith your full name andyour.email@example.comwith the email address you used to sign up for GitHub.
Practicing Contributing with VS Code
To practice using GitHub, we're going to walk through creating a repository, cloning the repository, making changes, and pushing those changes.
-
Create a new repository: Log in to your GitHub account and click the green "New" button on the sidebar. Alternatively, click the "+" icon in the upper right corner and select "New repository" from the dropdown menu.
Choose yourself as the owner of the repository, and enter a name for your repository. For this example, we'll use
practice-repository.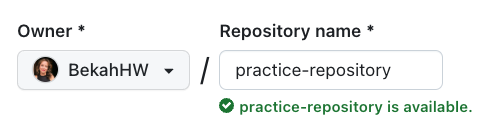
Choose whether you want it to be public or private. You can also choose to initialize the repository with a README file, a
.gitignorefile, and/or a license.For this example, initialize the repository with a README file.
-
Clone the repository: Once you have created a new repository, you can clone it to your local machine by running the following command in your terminal or command prompt:
git clone https://github.com/YOUR-USERNAME/REPOSITORY-NAME.gitReplace "YOUR-USERNAME" with your GitHub username and "REPOSITORY-NAME" with
practice-repository. -
Access your repository in your code editor: For this example, we're using VS Code. Open VS Code, navigate to the file tab, and then open your
practice-repository. -
Make changes and commit: There should be one file in your repository:
README.md. Inside that file, below# practice-repository, type 'hello world!' Once you have made changes, you can stage and commit them.Open your terminal and make sure you are in the right directory. For example, my coding projects are inside of my
Projectsfolder. Using my terminal, I would access this repository by running this command:cd projects/practice-repositoryOnce in the correct repository, use the following commands to add the changes you made and write a commit message with a description of the changes:
git add .
git commit -m "Your commit message"
Replace "Your commit message" with a brief description of the changes you made.
-
Push your changes: After committing your changes, you can push them to your remote GitHub repository by running the following command:
git push origin mainThis will push your changes to the
mainbranch of your remote repository. If you want to check your work, navigate to your GitHub repository. You should now see 'hello world!' in your README.md file.
You have now successfully set up Git and GitHub on your local machine and are ready to collaborate on open source projects!
VS Code
Visual Studio Code (VS Code) is a popular, free, and open source code editor developed by Microsoft. It supports a wide range of programming languages and offers many features that make it a great choice for open source development, including:
- Built-in Git support: VS Code provides built-in support for Git, allowing you to manage your Git repositories, stage and commit changes, and resolve merge conflicts directly from the editor.
- Extensibility: VS Code offers a rich ecosystem of extensions that can enhance your development experience and add support for additional languages, tools, and frameworks.
- Integrated terminal: VS Code includes an integrated terminal that allows you to run commands, scripts, and build tasks directly from the editor.
- Customizable: VS Code is highly customizable, allowing you to tailor the editor to your preferences and workflow. You can customize the theme, keybindings, and settings to create a personalized development environment.
To download and install VS Code, visit the official website and follow the instructions for your operating system.
Discord
Discord is a popular messaging and voice chat platform that is widely used by open source communities for communication and collaboration. By joining Discord servers related to your interests and projects, you can:
- Connect with other developers: Discord allows you to chat with other developers, ask questions, and share your knowledge with the community.
- Stay up-to-date: Many open source projects use Discord to share updates, announcements, and other important information. By joining their servers, you can stay informed about the latest developments and contribute more effectively.
- Participate in discussions: Discord servers often host discussions on various topics related to open source development. By participating in these discussions, you can learn from others, share your insights, and contribute to the collective knowledge of the community.
- Find collaboration opportunities: Discord servers can be a great place to find others who share your interests and are looking for collaboration opportunities. By networking with other developers, you can discover new projects to work on and form valuable partnerships.
To get started with Discord, visit the official website and sign up for an account. Once you have an account, you can search for open source communities and projects on platforms like GitHub or GitLab to find their Discord servers and join the conversation.
By familiarizing yourself with these tools and platforms, you'll be equipped to collaborate effectively, manage your projects, and contribute to open source projects. In the next chapter, we'll discuss how to contribute to open source projects, including finding projects to work on, submitting contributions, and what happens after your contribution is accepted.